The GitLab integration monitors your projects, branch protection rules, group membership, and security configurations. LowerPlane uses read-only API access and does not access source code contents.LowerPlane ships two separate GitLab integrations:
Integration
Use when
GitLab
Your projects live on gitlab.com
GitLab Self-Managed
You run your own GitLab instance on your own infrastructure
Both collect the same data and run the same tests. They differ only in how authentication is set up. GitLab Cloud uses LowerPlane’s own OAuth application, while GitLab Self-Managed uses an OAuth application that you create on your instance.
Read project metadata, branch protection rules, merge request settings, group members, and pipeline configuration
read_user
Read user profile
Identify the connecting user and read member profiles for access reviews
The read_repository scope is intentionally excluded. LowerPlane does not access code contents, commits, or file trees. The read_api scope provides all the metadata needed for compliance checks.Do not grant additional scopes when creating a self-managed OAuth application. read_api and read_user are sufficient, and requesting more will show your users a broader consent screen than LowerPlane actually needs.
LowerPlane runs 7 automated tests against your GitLab instance:
Test
Severity
Applies To
Code repo should be classified
Critical
Each project
GitLab group level MFA should be enforced
Critical
Each group
GitLab vulnerability scan should be enabled
Medium
Each project
Code changes should be reviewed by peers before merging
High
Each project
Merging of code changes should require passing status-checks
High
Each project
Branch Protection rules should be enforced
High
Each project
GitLab access should be removed for offboarded user
Critical
Each member
MFA is verified at the group level. The “GitLab group level MFA should be enforced” test requires the account you authorize with to be an Owner of the group, because GitLab only returns the require_two_factor_authentication flag to owners. If the authorizing account has a lower role, the test reports an explicit permissions reason rather than a failure.LowerPlane does not run a per-user MFA test for GitLab. GitLab exposes an individual user’s 2FA state only to instance administrators, which is never available on GitLab.com. Group-level enforcement (every member must enroll before accessing the group) is applied uniformly across GitLab Cloud and self-managed so that the evidence reads the same way for an auditor, and it is the reliable signal for SOC 2 CC6.1.
If you run your own GitLab instance, use the GitLab Self-Managed integration. It authenticates against your instance’s own OAuth endpoints using an OAuth application that you create and control.
A self-managed GitLab instance running GitLab CE or EE.
Permission to create an OAuth application on that instance: either instance administrator access (Admin Area) or the ability to create a user-owned or group-owned application.
An account that is an Owner of the groups you want covered, so the group MFA test can read the 2FA enforcement flag.
Your instance reachable from LowerPlane over HTTPS, with a valid publicly trusted TLS certificate.
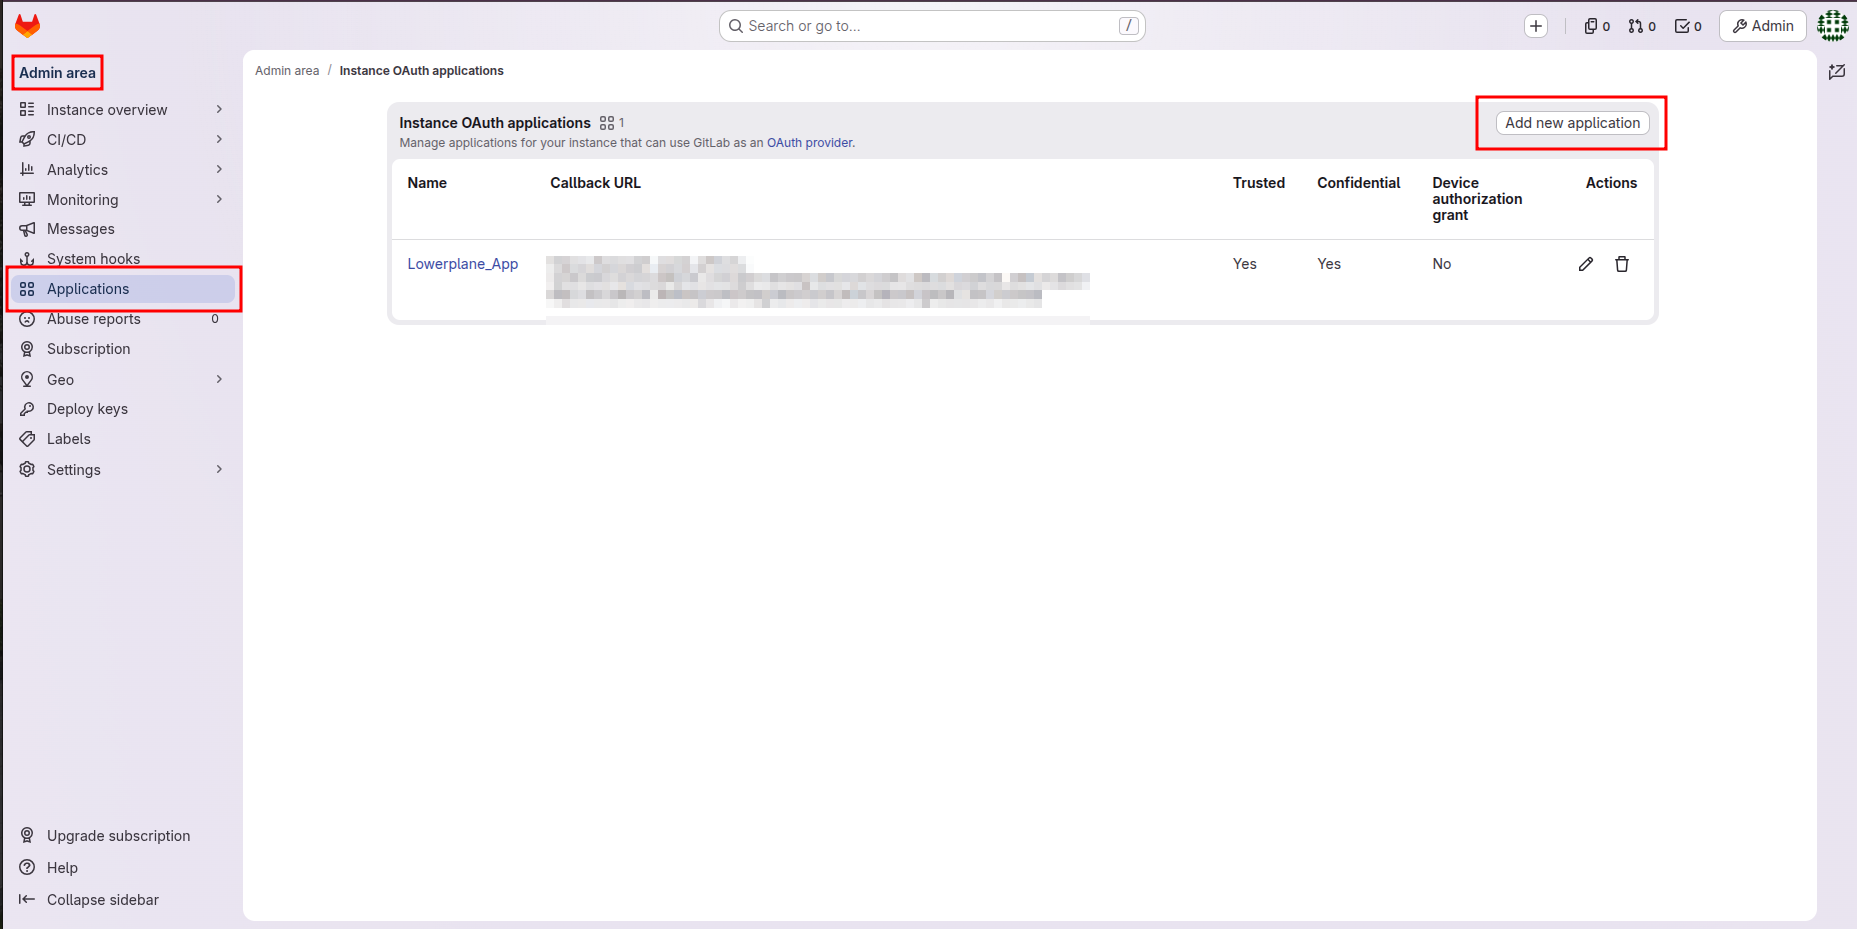
Sign in to your GitLab instance and go to Admin area → Applications, then click Add new application.
Admin area → Applications → Add new application
If you do not have instance administrator access, you can instead create the application under User Settings → Applications, or under Group → Settings → Applications for a group you own. All three work. LowerPlane only needs the resulting Application ID and Secret.
2
Fill in the application form
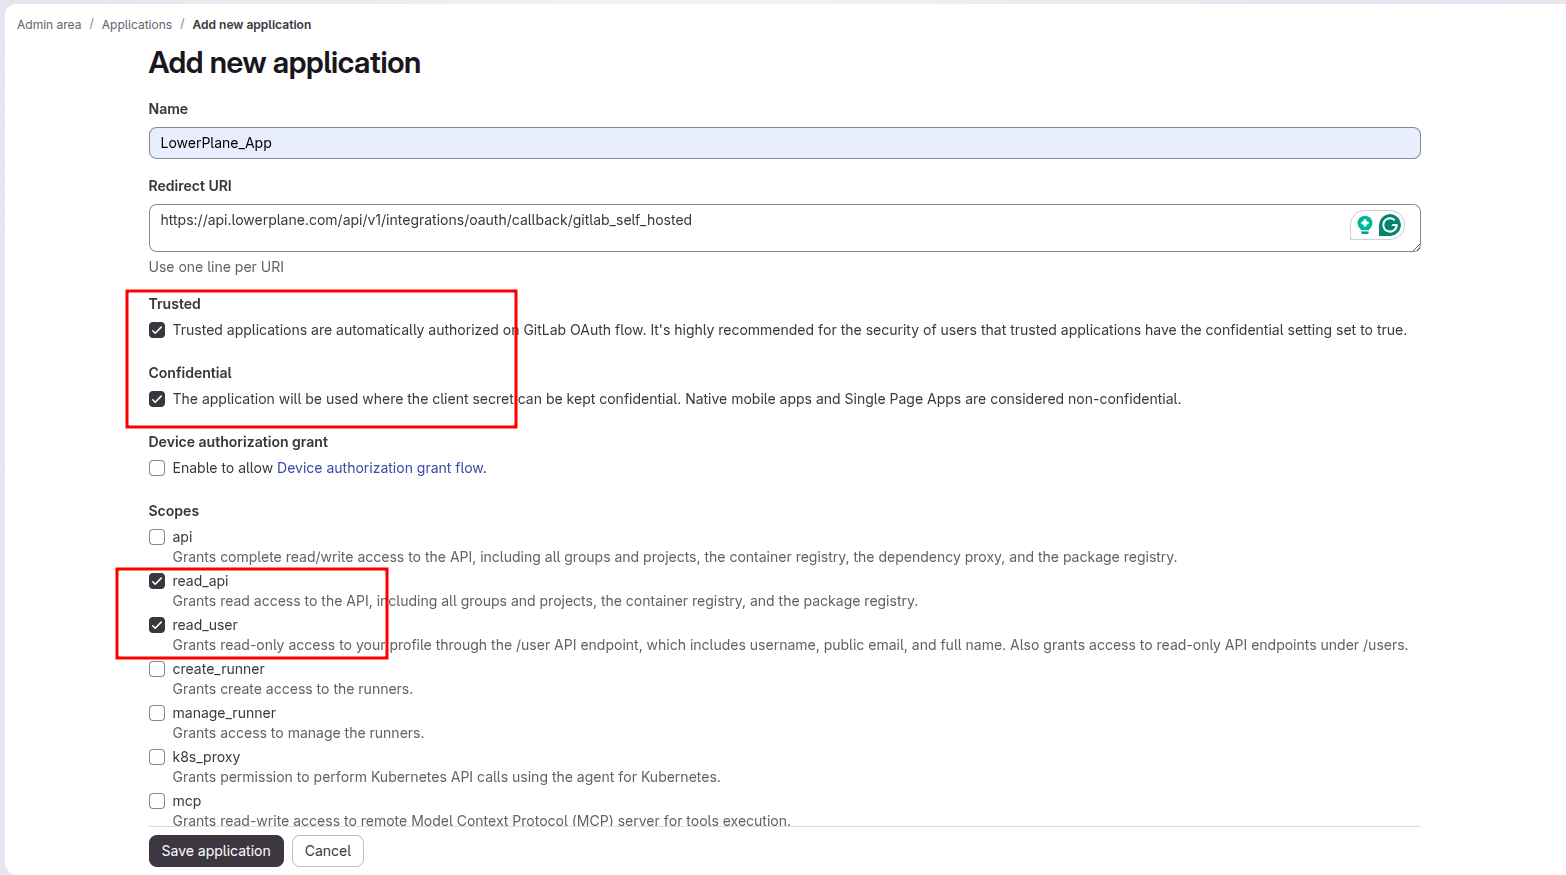
Complete the Add new application form as shown below.
The completed Add new application form. Note the Redirect URI, the two enabled checkboxes, and the two selected scopes.
Name: enter a name your team will recognize, for example LowerPlane_App.Redirect URI: enter exactly:
This value must match character for character, with no trailing slash. GitLab rejects the authorization request with “The redirect URI included is not valid” on any mismatch. This is the single most common cause of a failed self-managed setup.
Checkboxes:
Option
Setting
Why
Trusted
Enabled
Trusted applications are authorized automatically, so your users don’t see a consent screen on every connection.
Confidential
Enabled
LowerPlane authenticates with a client secret. Clearing this breaks the token exchange.
Device authorization grant
Disabled
Not used by LowerPlane. Leave it unchecked.
Scopes: select only these two:
read_api: grants read access to the API, including groups and projects
read_user: grants read-only access to the user profile
Leave every other scope unchecked.
3
Save and copy the credentials
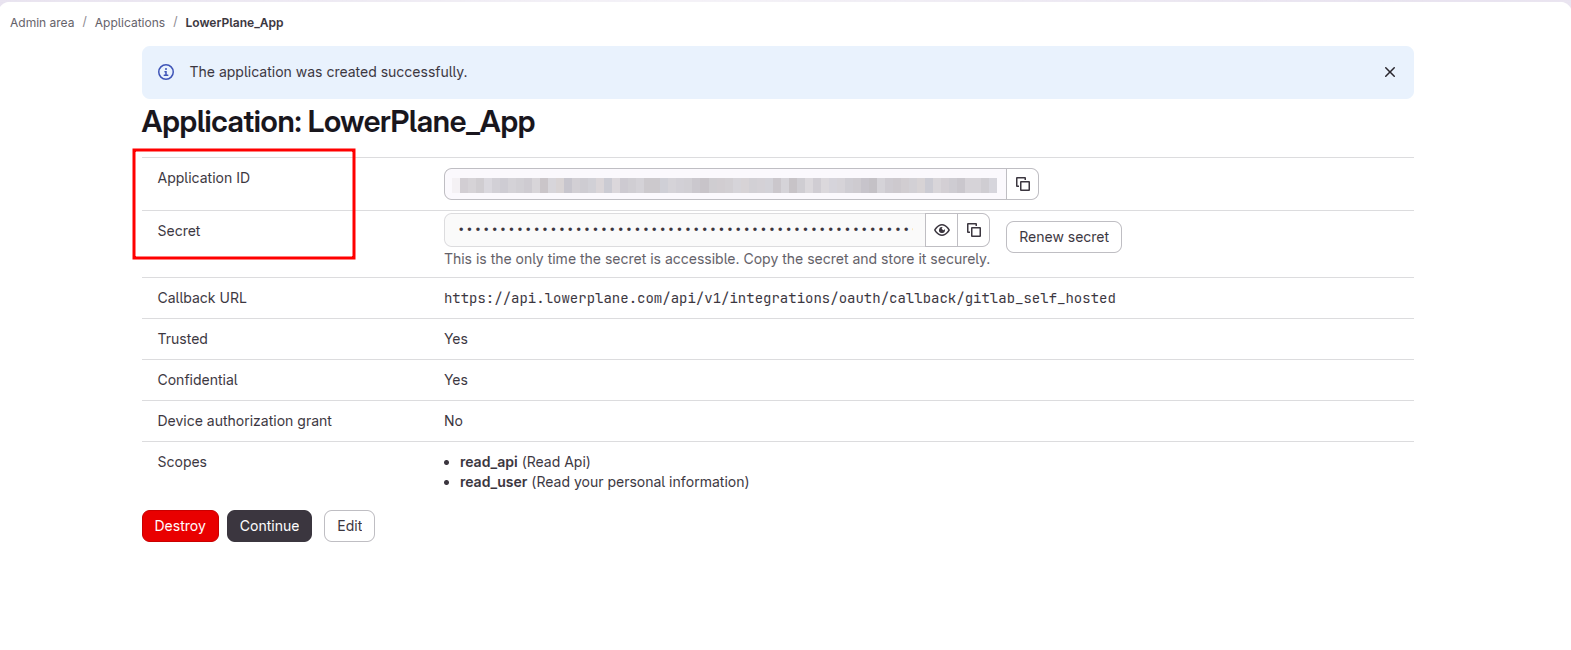
Click Save application. GitLab confirms the application was created and shows the Application ID and Secret.
Copy the Application ID and Secret. The secret is shown only once.
As GitLab notes on this page, this is the only time the secret is accessible. Copy both values somewhere secure before navigating away. Otherwise you’ll have to use Renew secret, which invalidates the old one.
Use this page to confirm the application is correct before continuing: Callback URL should match the Redirect URI above, Trusted and Confidential should both read Yes, and Scopes should list only read_api and read_user.
In LowerPlane, go to Settings > Integrations, find GitLab Self-Managed in the Version Control category, and click Connect.
2
Fill in the connection details
Three fields appear:
Field
What to enter
Hosted service URL
Your instance domain withouthttp:// or https://. If your instance is at https://gitlab.yourcompany.com, enter gitlab.yourcompany.com.
Application ID
The Application ID from Step 1.
Client Secret
The Secret from Step 1.
Pasting the full URL with a scheme or a trailing slash also works, since LowerPlane normalizes it to a bare host. The bare host is simply the canonical form.
3
Authorize on your instance
Click Connect with GitLab Self-Managed. You’ll be redirected to your own instance’s authorization page. Review the requested scopes and click Authorize.Sign in as the account that owns the groups you want covered. The connection inherits that account’s visibility, so LowerPlane can only see projects and groups that this account can see.
4
Initial sync
LowerPlane syncs your projects, members, and branch protection settings. This typically takes 1-2 minutes. Test results appear on the Tests page once the first sync completes.
The Redirect URI on your GitLab OAuth application does not match what LowerPlane sends. Open Admin Area → Applications, edit the application, and confirm the value is exactly:
Check for a trailing slash, a missing /v1, http instead of https, or a copied leading space.
Connection fails right after clicking Connect
Re-check the Application ID and Client Secret for truncation or trailing whitespace.
Confirm the Confidential checkbox is enabled on the GitLab application. A non-confidential application will not accept the client secret.
Confirm the Hosted service URL points at the instance where you created the application.
Hosted service URL is rejected
Remove http:// or https:// and any trailing slash.
Confirm the host resolves publicly and serves a valid TLS certificate. Self-signed certificates are not accepted.
No projects appear after connecting
LowerPlane sees only what the authorizing account can see. Confirm that account is a member of the groups and projects you expect, then trigger a manual sync from Settings > Integrations > GitLab Self-Managed.
Group MFA test reports a permissions problem
GitLab returns a group’s require_two_factor_authentication flag only to group Owners. Reconnect the integration using an account that is an Owner of that group, or mark the test as manually verified if owner access cannot be granted.
The connection stopped working after a while
GitLab access tokens expire, and LowerPlane renews them automatically using the stored refresh token, so expiry alone will not break the integration.A connection that stops working usually means the OAuth application was deleted, its secret was regenerated with Renew secret, or the authorizing account lost access to the groups. Reconnect the integration to re-authorize.
LowerPlane collects approver names on merge requests and pipeline status results to verify that peer review and CI/CD gates are enforced before merging. This data is used by the “Code changes should be reviewed by peers” and “Merging should require passing status-checks” tests.